MTurk Python Guide: Part 2 – Uploading HITs With Python
Technologies: Amazon Mechanical Turk, Javascript, Python
Alright, we’re back! I know, I know you missed me. Sorry I left you hanging back there with just a HIT and nothing to fill it in with. This one took a bit, but I swear I’m not slacking…I mean, I’m not always on point, but honestly I think a lot of people will benefit from this post so I wanted to make sure I got it right (read: don’t sound clueless).
To recap: in the last post, we created a new assignment template for our age guesser and used some Javascript to make it a bit nicer for our turkers to work on. When we ended we had everything we needed to start uploading actual HITs for the exotic and mysterious MTurkers to work on. In this post we’re going to actualize that potential.
For those skimming, here’s an overview of what’s going to be covered:
- Connecting to MTurk with boto.
- Exporting assignments to a CSV file for upload.
- Uploading assignments directly using the API.
Let’s get started.
[hamzh_toggle title=”Table of Contents” state=”closed”]
- Part 0 – Introduction
- Part 1 – Creating Your First HIT
- Part 2 – Uploading HITs With Python
- Part 3 – Processing HITs With Python
- Part 4 – Adding A Consensus Mechanism
- Part 5 – Charting The Results / Conclusion
[/hamzh_toggle]
Plug It In: Connecting To MTurk With Boto
Before we can do the really cool stuff we need to set up our API keys. You can use this help page to walk you through the process. Basically, if you don’t have an AWS account you first have to set one up. If you do, then you can simply reuse your AWS API credentials.
[hamzh_alert style=”green”] Advanced users, note that you cannot use IAM user credentials, Amazon requires you to use the credentials of the account you signed up for AWS with. [/hamzh_alert]
Now comes the fun part, using our credentials to connect to MTurk:
from boto.mturk import connection

AWS_ACCESS_KEY = '<YOUR ACCESS KEY>'
AWS_SECRET_ACCESS_KEY = '<YOUR SECRET ACCESS KEY>'

if __name__ == '__main__':
  mturk_connection = connection.MTurkConnection(
    AWS_ACCESS_KEY, AWS_SECRET_ACCESS_KEY)
  print list(mturk_connection.get_all_hits())
If all goes well you should see either an empty list or a list of all the hits you’ve already run before. If you get an error make sure to read it carefully, and if you still can’t figure it out feel free to post it in the comments section below for some help.
For Your TPS Reports: Exporting Assignments To CSV
Often it can be extremely useful just to export your assignments to a CSV file and then upload that CSV file to Mechanical Turk. Amazon provides built-in facilities to create and manage the HITs you upload this way. Luckily for us Python also has built-in CSV support, making this trivial. You need only export a CSV file with columns corresponding to each template variable. For our age guesser this will look something like the following:
We first import the python csv module
import csv
We can then connect to our database, make our query, and finally write out our results to the CSV file:
with open('mturk_upload.csv', 'w') as csvfile:
  writer = csv.DictWriter(
    csvfile, fieldnames=['person_id', 'image_url'])
  writer.writeheader()
  for row in cursor:
    writer.writerow({
      'person_id': row.person_id, 'image_url': row.image_url})
This should create a new csv file called mturk_upload.csv containing all the exported images.
Making It Seamless: Direct Upload To MTurk Using The API
For those who want a tighter integration with Mechanical Turk uploading HITs directly over the API is the way to go. The facilities for managing your results aren’t as nice. That being said, this is ultimately the way to go if you’re looking to automate fully.
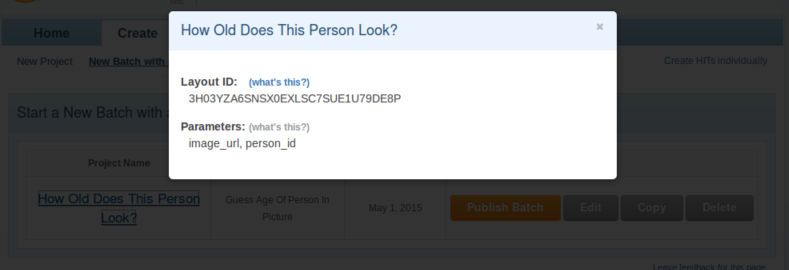
The first thing we need to do is get our HIT Layout ID from Amazon. Luckily there’s an easy way to do this. Login in to MTurk and under the “Create” tab click the name of your project:
You should then see a pop-up like the following one containing all the information you need:
The Layout ID field contains the HIT Layout ID. We’ll need this when uploading assignments over the API to tell Mechanical Turk what template we need it to fill in. Notice that you also get a convenient list of all the template variables you need to fill in from the Parameters section. Now all we need to do is plug that information in:
We’ve got a boatload of mturk imports, namely the stuff around layout parameters and assignment creation:
import datetime
import uuid

from boto.mturk import connection
from boto.mturk import layoutparam
from boto.mturk import price
Next we set up our AWS access constants:
AWS_ACCESS_KEY = '<YOUR ACCESS KEY>'
AWS_SECRET_ACCESS_KEY = '<YOUR SECRET ACCESS KEY>'
HIT_LAYOUT_ID = '3H03YZA6SNSX0EXLSC7SUE1U79DE8P'
Now we build out a simple list of layout paramaters. One for the ID of the person whose picture we’re, another for the URL of the image itself:
params = [
  layoutparam.LayoutParameter(
    'person_id',
    '1'),
  layoutparam.LayoutParameter(
    'image_url',
    'https://media.licdn.com/mpr/mpr/shrink_500_500/p/7/005/0b3/07f/3674b18.jpg')
]
Now we want to give this batch of assignments a unique ID. These IDs are what we’ll use in the next article to filter for tasks in a specific batch.
batch_id = str(uuid.uuid4())
Finally we connect to AWS and create our HIT.
conn = connection.MTurkConnection(AWS_ACCESS_KEY, AWS_SECRET_ACCESS_KEY)
description = (
  '(Should take < 1 minute) We show you a picture and ask for your best guess'
  ' as to how old the person is.')

result = conn.create_hit(
  hit_layout=HIT_LAYOUT_ID,
  reward=price.Price(amount=0.10, currency_code='USD'),
  max_assignments=1,
  title='Guess Age Of Person In Picture',
  description=description,
  layout_params=layoutparam.LayoutParameters(params),
  keywords=['image', 'age', 'how old?'],
  lifetime=datetime.timedelta(days=7),
  duration=datetime.timedelta(minutes=10),
  approval_delay=datetime.timedelta(days=2),
  annotation=batch_id)

print "Batch ID:", batch_id
print result
I’ve decided to use my current LinkedIn photo and hope people are nice. If all goes well you should get a console print out like the following one.
$ python upload_hits.py
Batch ID: 47dc4913-b4cf-405a-88cf-584b38ddaa74
[<boto.mturk.connection.HIT object at 0x7fab92da6690>]
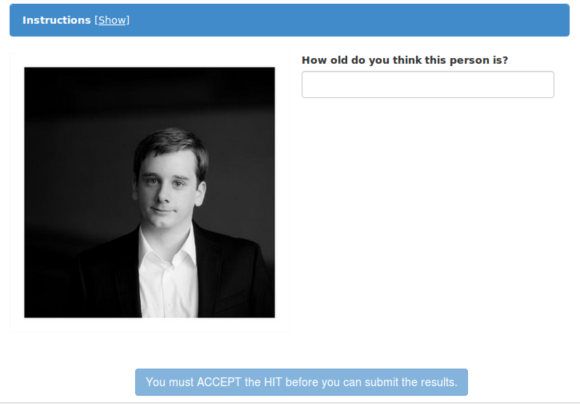
That’s it, your assignment is officially up on Mechanical Turk awaiting someone to work on it. The turker sees something like this:
I figured I’d eat my own dog food and have a random turker guess my own age from my LinkedIn photo!
The results are below, and let’s just say they’re not what I expected.
So, MTurk Thinks I’m Old: Manually Reviewing Your HITs
To manually check up on how your assignment is doing you can use the “Manage” tab in the MTurk dashboard. You then want to click on “Manage HITs Individually” in the upper-right corner.
You’ll then see a list of all the HITs you have open. The ones shaded in blue are currently open. As you can see below, I quickly had one submission awaiting review.
Clicking “Review Submission” I can even see what the person answered.
They guessed 36! Well, even though either time or the turker has not been kind to me, I still (begrudgingly) approved the HIT. This triggers a payout and marks the assignment as accepted.
We Made It!
That’s it!
As you can see even creating new HITs through the API is pretty easy.
In the next article I’ll show you how to manually download your results, process them however you like, and then accept the HITs and pay your turkers. And all with only Python and Boto!
Stay tuned for Part 3!
