MTurk Python Guide: Part 1 – Creating Your First HIT
Technologies: Amazon Mechanical Turk, Javascript, Python
In the previous section I briefly ran you through why you might want to use Mechanical Turk. In this section we’re gonna start putting the rubber into contact with the road by designing our assignment.
Here’s what we’ll cover:
- Creating a new assignment.
- Determining how much to pay.
- Using Javascript to improve the effectiveness of your HITs.
Careful assignment design is crucial to getting the best results from Mechanical Turk. You should strive to design your assignments knowing that turkers are looking to work quickly so they can complete as many HITs as possible in a given amount of time. This means you should design your HITs to avoid common mistakes and help turkers hone in on relevant information.
[hamzh_toggle title=”Table of Contents” state=”closed”]
- Part 0 – Introduction
- Part 1 – Creating Your First HIT
- Part 2 – Uploading HITs With Python
- Part 3 – Processing HITs With Python
- Part 4 – Adding A Consensus Mechanism
- Part 5 – Charting The Results / Conclusion
[/hamzh_toggle]
Example HIT: How Old Does This Person Look?
We first need something to work on. After thinking about it for a bit I thought it would be fun to build a crowdsourced version of Microsoft’s http://how-old.net. This is a website where you can submit your own picture or search for a picture and it will attempt to estimate how old all the people in the picture are. Instead of all that fancy schmancy machine learning we’re going to ask turkers to give us their best guess.
We start by creating a new project. You can think of the project as a template for future assignments. The project contains placeholders (for images, text, or hidden input fields containing IDs) that are filled in to create individual assignments.
I usually start with pre-existing template and then mold it into what I want. I’ve chosen to start from a “Transcription from an Image” project template provided by Amazon. We begin by filling out the project properties:
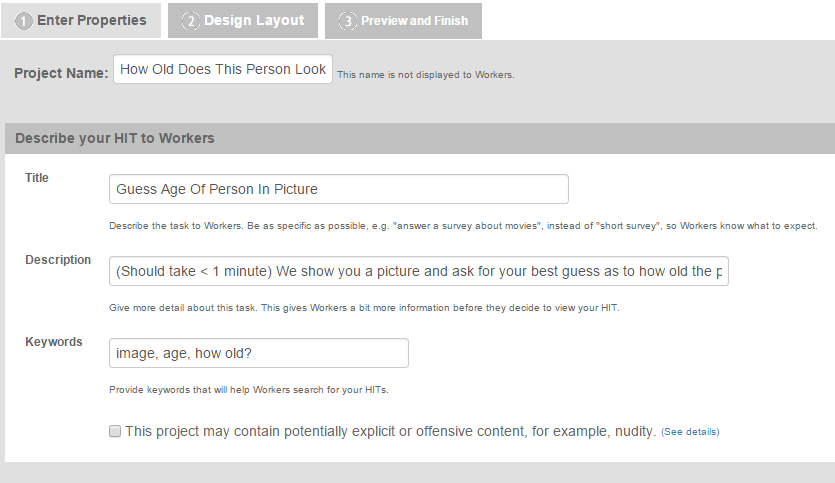
The Title and Description fields will be shown to the turkers to help them figure out what they have to do to complete your assignment. A high quality description should explain briefly what you’ll be having them do and how long you estimate it will take them. The attached keywords are then used to help turkers find your assignments easier.
The Ethical Guide To Determining How Much To Pay
Choosing the right price for your HITs is crucial, and it can be tricky to figure out when you’re first starting. It’s here that those using Mechanical Turk as a digital sweatshop are separated from those using Mechanical Turk as fair and equitable way to employ of other people. Many turkers consider it unethical to pay under $0.10 per minute. This amount works out to a $6.00 hourly wage or the minimum wage in the US (though many states pay higher). Turkers specifically pay attention to price when determining whether or not a HIT is worth their time. As one turker said in a survey “…I figure a good task is one I can make 10 to 12 cents a minute on.” If you’re looking to get your HITs done quickly and have high-quality turkers work on them (and trust me, you are!) then you should make sure you pay your turkers fairly. If you want a quick rule of thumb it’s:
[hamzh_alert style=”green”] Fair Pay = $0.10 x (Average Number Of Minutes Per Assignment) [/hamzh_alert]
To help disseminate this kind of information Stanford and the University of California, San Diego have teamed up to create a platform called Dynamo. For more information you can read their article about Fair Payment on Mechanical Turk by clicking here.
After doing a few samples of our assignment myself I found that roughly two such tasks can probably be completed in a minute and so I’ve gone ahead and opted for a $0.10 payout per task (since I assume some turkers will work slower than me). I’ve then set the time allotted per assignment to 10 minutes. Workers are no longer able to submit your assignment when they run out of time. So make sure to set a high time limit so no one has to feel rushed:
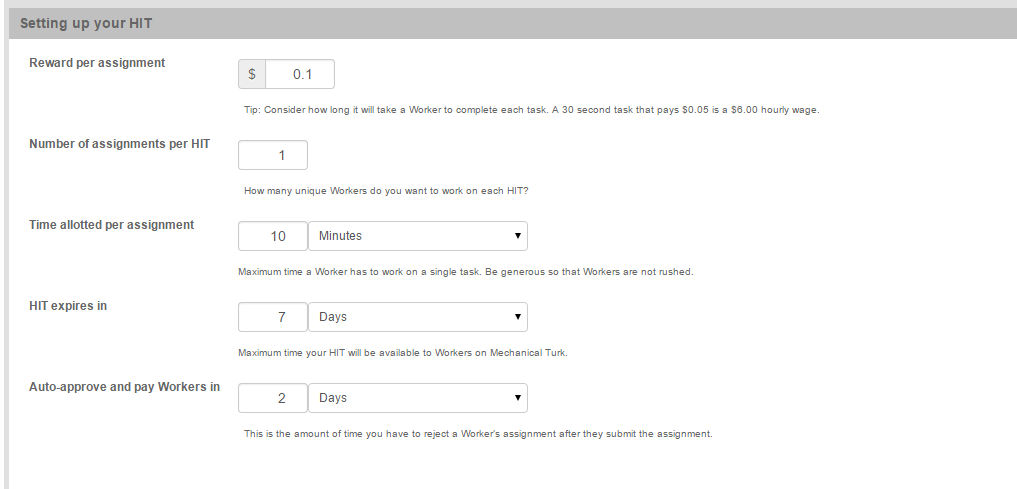
Notice we set all of our assignments to be automatically approved in 2 days – meaning we have 2 days to review and reject any assignments before they are automatically accepted and paid out. If we can’t find anyone to complete our HITs then they expire and are no longer shown on the site after 7 days. There’s no hard or fast rules on these, so just set them in a way that ensures you don’t feel rushed when processing your HITs.
Worker Qualifications: Separating The Wheat From The Chaff
The final step in filling out this first page is setting worker qualifications. You can find this by clicking the advanced button in the lower right-hand corner:

By default a Master Worker qualification is required for all new projects. Amazon does this so first-time or new requesters will automatically get higher quality turkers. Master Workers are workers who have demonstrated proficiency at a particular task (like categorization) or at many different types of tasks. They are maintained by Amazon as an easy way to guarantee high quality results. You can read all about the Masters Qualification here.
Qualifications overall are a complex and useful tool that we unfortunately won’t have time to get into here, but if you’d like read more there’s a decent introduction here.
Once you’ve opened the advanced view you can see your current qualifications and edit them in a view something like this:

Note that you’ll generally get less interest from Master Workers for lower paying HITs. If for some reason you’d like to remove the master worker qualification and open your task up to all workers in general, you can simply click the remove button right next to the Masters drop-down:

Once we’re happy here we can click “Design layout” and this will move us on to the part where we’ll be putting in the majority our work. When the page loads you’ll see something like:
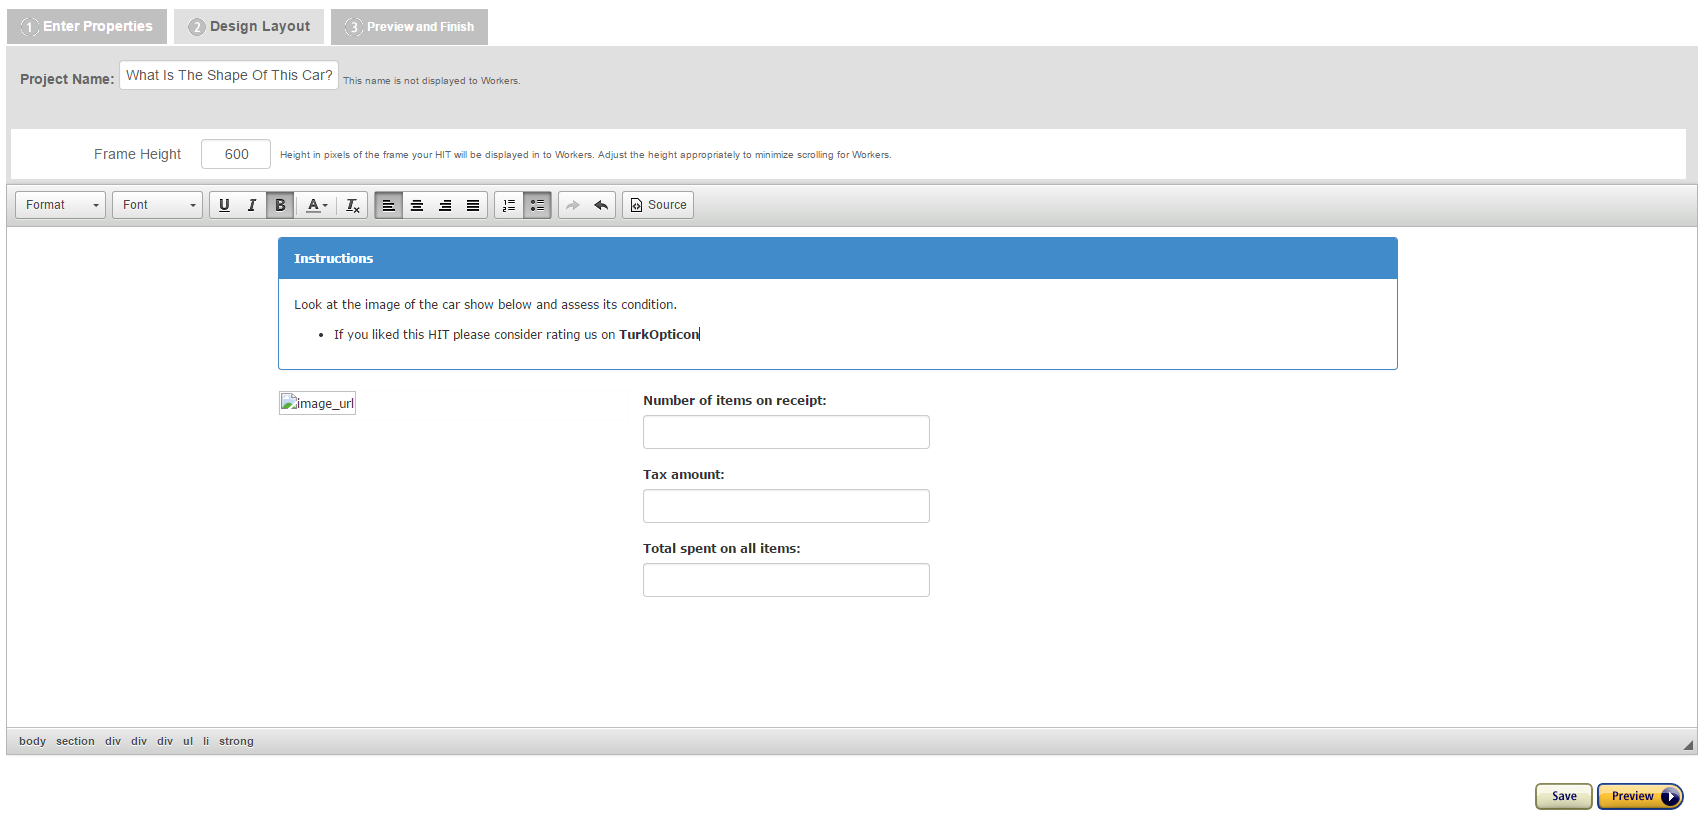
This is our clay to be molded as we create our assignment.
The image_url field is a place_holder (a template variable if you will) that will be replaced with any actual image once we upload real assignments. We can have as many placeholders as we like, and it’s often useful to create hidden input fields that contain ids, as we’ll see later.
For now, the first thing we want to do is make our instructions collapsible. This will allow workers who are completing many of our HITs in one go a chance to save screen real-estate, and is generally nice to include.
First Things First: Showing And Hiding The Instructions
Click the “Source” button located in the upper right-hand corner. This will get you to the HTML editor. Now we’re going to add import jQuery and get to work. Add the following line to the top of your source file:
<!-- JQuery 1.11.2 -->
<script src="//code.jquery.com/jquery-1.11.2.min.js"></script>
<script src="//code.jquery.com/jquery-migrate-1.2.1.min.js"></script>
Now we add some CSS to the bottom to give us some pretty links:
.show_hide_instructions {
color: #fff;
text-decoration: underline;
}
.show_hide_instructions:hover {
cursor: pointer;
}
Then we modify the instructions box at the top to add our show/hide link:
<div class="panel-heading">
  <strong>Instructions</strong>
  <span>
    [<a class="show_hide_instructions" href="javascript:void(0);">Show</a>]
  </span>
</div>
Finally we add some basic jQuery magic to get that panel to show and hide:
<script type="text/javascript">
$(".show_hide_instructions").click(function () {
  if ($(".panel-body").is(":visible")) {
    $(".panel-body").hide();
    $(this).html("Show");
  } else {
    $(".panel-body").show();
    $(this).html("Hide");
  }
});
</script>
The result is something that looks like this when we click into the preview window:

Congrats, you’ve just added your first simple feature. When you design more complex assignments or assignments that take up more space this will definitely be appreciated.
Now that we’ve gotten that out of the way we want to replace the questions shown with our own.
Making It Ours: Customizing The Questions
Now let’s actually change the HIT so it contains the questions we’d like to ask. Replace everything in the inputfields div with the content below:
<input name="PersonID" type="hidden" value="${person_id}" />
<div class="form-group">
  <label>How old do you think this person is?</label>
  <input class="form-control" name="AgeOfPerson" size="30" type="text" />
</div>
Note that the name property on all the HTML elements will also be the name given to the property when we retrieve it using Python in a later article. So choose good names. Also, the astute observer will see that we added a hidden input field named PersonID. This field will help us correlate our results with objects in our image database. The ${person_id} portion in the string indicates a template variable to be filled in for each assignment. All this should give you the following HIT:

Conclusion: That Wasn’t So Bad, Right?
That’s it! We’ve created our first HIT. There’s so much more you can do with jQuery to massively improve the quality of your HITs. For example, validating typed input or improving the way images are shown to users. While we’ve barely scratched the surface, I hope you’ve enjoyed it and that this is enough to get you started.
In the next article I’ll show you how to publish a batch of assignments using Python and Boto.
Did I miss something? Have anything to add? I’d love to hear from you in the comments below.
Related Posts